Tuesday, April 16, 2024

Battle Of Fuentes De Oñoro - French Playthrough: Turn Five

Situation after turn four
My activation dice land 4, 3 and 1. I reroll the 1, but get another 3.
In area 4 my infantry advance.
In area 3 Marshal Masséna moves to occupy the high ground vacated by the infantry in area 4. The artillery fire at the Allied infantry opposite them, the three dice increased thanks to the marshal. I roll 6, 4 and 1, reducing the unit to one-strength and forcing it obliquely back a hex. The infantry in San Pedro fire at the enemy directly ahead, rolling a disappoint two 3s and 2. The other infantry advance obliquely right and fire at the enemy wading the river, the four dice decreased for moving. I roll 6, 4 and 1, reducing the enemy unit to two-strength and forcing it obliquely back into trees.
If the AI gets the right activation dice, the effect could be devastating for my chances
The AI rolls 6, 3 and two 2s. The 6 and a 2 are rerolled, both landing as a 5,
In area 2 the infantry roll 1, edging towards Almeida.
In area 3 the two-strength infantry fire at San Pedro, their three dice increased for being on higher ground, but decreased for the target being in cover. They roll 6, 2 and 1, reducing my unit to one-strength. The three-strength infantry roll 4, advancing and firing at the enemy furthest up, ie my men in San Pedro. The four dice are increased for being on higher ground, but decreased for the target being in cover, and they roll a miserable 2 and three 1s.
In area 5 the infantry roll 4, advancing obliquely into the river. The cavalry roll 5, but cannot move closer to the nearest enemy.
It is the halfway point, and the Allied army still looks formidable, but the French have hope if the rest of the army can quickly advance to support the leading units around San Pedro

Monday, April 15, 2024

Battle Of Fuentes De Oñoro - French Playthrough: Turn Four

Situation at the end of turn three
My activation dice are two 6s and 3. I keep the 3, but turn the wildcard 6s into 4 and 2.
In area 3 the artillery fire at the Allied infantry opposite them, the three dice increased thanks to support from Marshal Masséna. I roll 4, two 3s and 1, forcing the infantry back a hex. Masséna stays where he is. The front infantry enter San Pedro and fire at the nearest Allied infantry wading the river. The four dice are decreased for moving, and I roll 6, 4 and 2, reducing the enemy to two-strength and forcing them back onto the hill. The rear infantry advance, as do the infantry in areas 2 and 4.
My infantry in San Pedro have cover, but are out on a limb
The AI's activation dice are two 2s and two 1s. One of each pair is rerolled, landing 4 and 1.
In area 1 the artillery roll 6, advancing.
In area 2 the infantry roll 1, withdrawing obliquely left in the direction of Almeida.
In area 4 the two-strength infantry cannot fire at my men in San Pedro because of the plateau effect of high ground. Instead they roll 4, meaning they move obliquely right towards the French commander. This puts them in position to fire at San Pedro, their three dice increased for being on higher ground, but decreased for moving and for the target being in cover. The AI rolls 6 and 3, reducing my unit to two-strength. The rear infantry roll 5, advancing.
The fighting around San Pedro could be pivotal for my chances of assaulting Almeida

Sunday, April 14, 2024

Battle Of Fuentes De Oñoro - French Playthrough: Turn Three

Situation after turn two
My activation dice land 5, 4 and 3, which I keep.
In area 4 my infantry fire at the Allied cavalry in the copse, the three dice increased for being on higher ground and next to Marshal Masséna, but decreased for the target being in cover. I roll 5, two 2s and 1, eliminating the Allied one-strength unit. Masséna moves behind the French artillery.
In area 3 the artillery fire at the Allied infantry opposite them, the three dice increased thanks to support from the marshal. I roll 5, 4 and two 2s, reducing the infantry to two-strength and forcing them back a hex. Both French infantry units advance.
In area 5 both cavalry units advance to behind the ridge.
The AI's activation dice are two 6s, 4 and 3. The 6s are rerolled as 2 and 1.
In area 1 the infantry roll 2, moving obliquely back left to be nearer Almeida, preferring to take high ground. The artillery roll 4, but cannot advance obliquely right.
In area 3 the three-strength infantry cannot fire through San Pedro, and instead roll 1, moving obliquely left towards Almeida. The two-strength infantry roll 3, occupying the hex their comrades just vacated.
In area 4 the front infantry roll 4, advancing. The rear infantry roll 1, moving obliquely back to the left to be on the edge of Almeida.
A lot of Allied blood will have to be spilt if Almeida is to be captured

Saturday, April 13, 2024

Battle Of Fuentes De Oñoro - French Playthrough: Turn Two

Situation after turn one
My activation dice are two 4s and 3. I reroll a 4, but it becomes another 3.
In area 4 my infantry fire at the advancing Allied cavalry. Their three dice are decreased for firing through trees, but increased for being on higher ground and next to the French commander. I roll two 6s and two 2s, reducing the Allied unit to one-strength. Marshal Masséna stays where he is, behind high ground.
In area 3 the forward infantry advance and fire at the Allied cavalry, their two dice reduced for moving. I roll 4, forcing the cavalry to fallback a hex. The rear infantry advance onto high ground, and the artillery remain where they are (they cannot fire at the infantry ahead of them due to the plateau effect of high ground).
The AI's activation dice land 4, 3 and two 2s. A 2 is rerolled, but does not change.
In area 2 the infantry roll 4, moving obliquely forward to the left to be nearer the French commander.
In area 3 the forward infantry throw 5, advancing. The rear infantry roll 4, advancing obliquely forward to the left to be nearer the French commander,
In area 4 the bloodied Allied cavalry roll 5, pluckily - foolhardily? - advancing into the single copse of trees near the French-occupied ridge. The forward infantry roll 4, advancing obliquely left. The rear infantry roll 3, climbing onto high ground.
[I forgot to physically move Wellington to Almeida last turn, but that has not affected the game. I have also turned over the artillery counters so both units are shown at full strength.]
With the exception of one unit of cavalry, the Allies are cautiously holding back, which may well be their best plan for defending Almeida

Friday, April 12, 2024

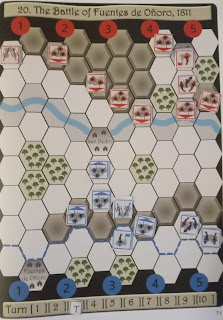
Battle Of Fuentes De Oñoro - French Playthrough: Setup & Turn One

THE 20th and final scenario in Mike Lambo's Battles Of Napoleonic Europe is the Battle of Fuentes de Oñoro fought from the French side.
Since I lead my series against the AI by 11 wins to nine, it might be thought the result of the series is already decided.
However, that score includes a scenario fought twice, and if the 'replay' is excluded from the total, my lead is reduced to 10-9.
If that argument is accepted, it means the AI could still tie the series.
The French start below the blue dashed line
The human receives, in addition to the French commander, Marshal André Masséna, four units of infantry, two of cavalry and one of artillery.
To win I have to get the commander into Almeida at the top of the map before the 10 turns of the battle are completed.
I have, rather naturally, favoured the right flank of the battlefield
The AI receives, in addition to Viscount Wellington, seven units of infanty, two of cavalry and one of artillery,
The AI's setup is almost completely pre-determined, rather than decided by dice-rolls as is the case in most scenarios
The Allied artillery is somewhat misplaced, it would seem, but otherwise the AI is well-positioned to resist an advance on Almeida.
As usual, I will write up the battle as I go along.
TURN ONE
My activation dice land 4, 3 and 2, which I decide to keep, advancing all the units in those areas one hex directly ahead.
The AI's activation dice are two 5s, 4 and 3. A 5 is rerolled, but comes up 4.
In area 3 the infantry units roll 2 and 1, which have the same effect, namely to order them to move nearer Almeida, but only the rear unit can do so.
In area 4 the cavalry roll 4, advancing two hexes directly down the map. The forward infantry also roll 4, advancing. The other infantry roll 1, moving to the edge of Almeida. Wellington enters Almeida so as to support three friendly units, preferring a buildings hex over a high-ground hex that would have also enabled him to support three units.
In area 5 the cavalry roll 3, which has no effect as no enemy is within three hexes. The infantry roll 6, advancing.
One of the Allied mounted units has advanced precipitately

Thursday, April 11, 2024

El Pillbox

ON a recent visit to Spain I was walking along the Costa Blanca near the city of Altea when I came across an abandoned pillbox.
It is a survivor of eight that were apparently built on local beaches by Republicans in response to a sea blockade established by Nationalists' fascist allies in the Spanish Civil War.
Altea pillbox - still enjoying a commanding view of possible landing sites 
Most of the pillboxes have been allowed by civic authorities to go to ruin, or been destroyed by the action of the sea undermining the pillboxes' gravel base, or, in at least one case, completely submerged by the sea.
But the one I saw was in fairly good condition - superior in preservation to most British examples, according to a specialist report I saw.
None of the Altea pillboxes ever fired a machinegun in action, it seems, and perhaps events in Spain in the 1930s are now long enough ago that the above surviving pillbox can be preserved and restored by the local council without causing anyone undue offence.

Wednesday, April 10, 2024

Battle Of Fuentes De Oñoro - Summing Up My Allied Playthrough

IT did not take me long to realise I had seriously messed up the Allied deployment - the under-strength left wing had little chance.
I was also, I believe, unlucky with my dice throws.
But, perhaps more fundamentally, my whole strategy was wrong in that it is probably unwise to split your forces when you have the smaller army.
Instead I should have concentrated on capturing one of the villages, and then turned my attention to to the other.
Anyway, I now lead the AI in our series 11-9 (includes one scenario fought twice).

Tuesday, April 09, 2024

Battle Of Fuentes De Oñoro - Allied Playthrough: Turn Six

Situation at the end of turn five
My activation dice land 5 and two 3s. I reroll a 3, but it turns up 3 again.
In area 3 my artillery fire at the French artillery, but roll 3 and 1. The forward infantry fire at the nearest French infantry, rolling two 4s and 2, but the retreat-effect of the 4s is cancelled by the presence of Marshal Masséna. My three-strength infantry advance obliquely left and fire at the same French infantry, their four dice being decreased for moving. I roll 3 and two 1s.
In area 5 the infantry advance obliquely left.
The French army outnumbers the Allies by nine units to five
The AI's activation dice are 6, 4 and two 2s. The 6 and a 2 are rerolled, landing 4 and 1.
In area 1 the forward cavalry attack my infantry, rolling two 6s, two 5s and 1, eliminating my unit.  The infantry roll 3, but cannot, as required, move straight down. The one-strength cavalry roll 2, but that has no effect as no enemy is within three hexes.
In area 2 the forward infantry fire at my two-strength infantry, preferring them as a target for being nearer a village. Their four dice are increased for being next to Marshal Masséna, and they roll two 5s, 4, 3 and 2, eliminating my unit. The other infantry roll 5, advancing a hex. Masséna advances obliquely right so he can support three French infantry units.
In area 4 the infantry roll 6, advancing a hex.
With the Allied position clearly hopeless, I resign

Monday, April 08, 2024

Battle Of Fuentes De Oñoro - Allied Playthrough: Turn Five

Situation at the end of turn four
My activation dice land 6, 2 and 1. I reroll the 2, getting 4, and turn wildcard 6 into 3.
I start in area 3 by firing my artillery at the French artillery. rolling 4 and 1, but the enemy are not forced back a hex as they are supported by the French commander. My infantry fire at the French two-strength infantry ahead of them, rolling a miserable two 2s and two 1s.
In area 4 Wellington advances obliquely left one hex. The cavalry also advance obliquely left, and charge the three-strength French infantry, their four dice being increased for being next to Wellington. I roll 5, 4, 3 and two 2s, reducing the infantry to two-strength and forcing it back a hex. My infantry advance obliquely left and fire at the nearest French infantry, their three dice being decreased for moving, but increased for being next to Wellington. I roll 6, 5 and 2. eliminating the enemy unit.
In area 1 I advance both units onto the hill.
It's a game of two flanks!
The AI's activation dice land 5, 4, 2 and 1.
In area 1 the two-strength cavalry attack my one-strength infantry, a die throw deciding they first advance directly down the map. They roll 6, 5, 4, 2 and 1, eliminating my unit. The infantry roll 1, meaning they occupy Fuentes de Oñoro. The one-strength cavalry roll 1, which has no effect as no enemy is within three hexes.
In area 2 the forward infantry fire at Wellington, their three dice being increased for being next to Marshal Masséna, and they roll 6, 4 and two 3s, killing my commander. The other infantry roll 2, but cannot move any nearer one of the villages and so stand still. Masséna also remains where he is.
In area 4 the infantry fire at my cavalry, their two dice being reduced for the target being in trees, but they roll 5, eliminating my unit.
In area 5 the infantry roll 5, meaning they want to move nearer my forward infantry in area 3, and they do so vertically.
The French are doing well

Sunday, April 07, 2024

Battle Of Fuentes De Oñoro - Allied Playthrough: Turn Four

Situation at the end of turn three
My activation dice land 6, 3 and 1. I turn wildcard 6 into 4.
In area 1 my backward infantry advance a hex and attack the three-strength French cavalry. The three dice are increased for attacking from an adjacent hex after moving. I roll 6, 4, 3 and 1, reducing the enemy to two-strength and forcing them back a hex. The other infantry advance a hex and attack the withdrawing French, getting five dice - one more than their colleagues thanks to being on higher ground. I roll 5, 4, two 3s and 2, reducing the French to one-strength and forcing them back another hex.
My artillery fire at the French artillery, but I roll two 1s.
In area 4 my cavalry attack the one-strength French, the five dice being increased for being next to Wellington, but decreased for the enemy being in cover. I roll three 6s and two 4s, eliminating the French unit. The two-strength infantry fire at the nearest French, the three dice being increased for being next to Wellington. I roll two 6s, 3 and 1, eliminating the enemy unit. The other infantry advance obliquely left in the hope of joining my left wing. Wellington stands pat.
One village is occupied by the Allies, at least for now, but the situation on the Allied left looks tricky to say the least
The AI's activation dice are 6, two 3s and 2. The 6 and a 3 are rerolled, but become two more 6s.
In area 2 the forward infantry fire at the nearest British infantry, their four dice being increased for being next to Marshal Masséna. They roll two 4s and three 1s, forcing my unit off the hill. The cavalry canter through Fuentes de Oñoro and charge my remaining infantry on the hill, rolling two 6s, two 4s and 2, reducing my unit to one-strength and also forcing it off the hill. Masséna remains where he is, supporting three French units. The backward infantry roll 2, advancing to be next to Fuentes de Oñoro.
In area 3 the artillery fire at my cavalry, which is their nearest target. Their two dice are increased for being next to the commander, but reduced for firing through trees and for the target being in cover. They roll 6, reducing my unit to one-strength. The infantry roll 5, advancing  a hex. They want to fire at my cavalry, but their two dice would be cancelled by the intervening trees and the buildings. Instead they fire at Wellington, the two dice being decreased for the target being in trees. They roll 4, but commanders do not retreat, so there is no effect.
I clearly got the balance of my two columns wrong